In this guide, you’ll learn how to use Mojang mappings when developing Minecraft plugins. 

Here’s what you’ll learn today:

  • What are Mojang mappings — And the difference between obfuscated names, Spigot mappings and Mojang mappings.
  • Using Mojang mappings on Minecraft 1.14.4+— Getting remapping Spigot jar with Mojang mappings using BuildTools.
  • Compiling your remapped plugin (Maven and Gradle) — How to remap your Mojang-remapped plugin Spigot mappings for production.
  • Project: Mob AI — Creating a Snowman mob using custom pathfinders.

Recommended Episodes:

What are Mojang and Spigot Mappings

Obfuscation — Minecraft server is obfuscated, which means methods and fields are replaced with random letters, such as “getWorld()” is “a()”.

Mojang mappings — As of Minecraft 1.14.4, the company behind Minecraft, Mojang, has released its obfuscation mappings to translate the letters back to their original names.

Spigot mappings — The Spigot/Paper/Purpur server you are running uses Spigot’s mappings (originally developed by Bukkit) and a lot of methods are still left obfuscated, that is why we now recommend to use Mojang mappings when using NMS to develop Minecraft plugins.

License limitations — Mojang restricts the use of mappings for development purposes only, so before publishing your plugin we need to convert them back into Spigot’s mappings.

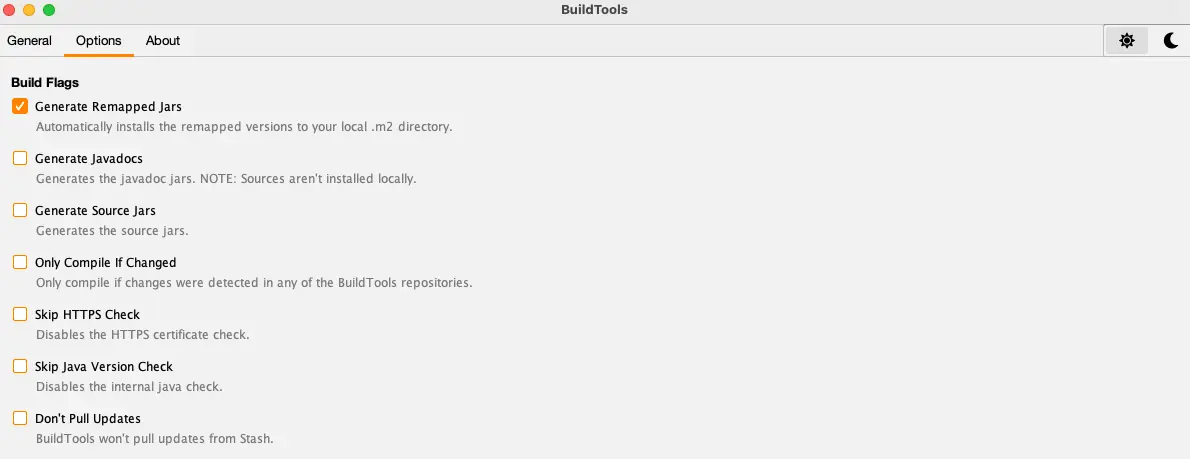
Step 1. Getting Mojang Mappings

Using BuildTools — Download BuildTools, double-click the jar to open its GUI, navigate to Options tab and check “Generate Remapped Jars”. Then come back to the main tab, select your version and let it run.
 

Step 2. Using Mappings In Your Plugin

Maven Installation Instructions

In your pom.xml, find the dependencies section, and place the following snippet to the top. You can remove Bukkit/Spigot API because mappings include it.

If you want to use Paper API, keep Paper API dependency and place it above Spigot mappings.

				
					<dependency>
    <groupId>org.spigotmc</groupId>
    <artifactId>spigot</artifactId>
    <version>1.20.4-R0.1-SNAPSHOT</version>
    <scope>provided</scope>
    <classifier>remapped-mojang</classifier>
</dependency>


Change the version to your desired version. Your version must match the one from BuildTools.

Then, navigate to build section of pom.xml. Place the following Maven plugin code to the plugins section and read the notes below:


					<plugin>
    <groupId>net.md-5</groupId>
    <artifactId>specialsource-maven-plugin</artifactId>
    <version>1.2.4</version>
    <executions>
        <execution>
            <phase>package</phase>
            <goals>
                <goal>remap</goal>
            </goals>
            <id>remap-obf</id>
            <configuration>
                <srgIn>org.spigotmc:minecraft-server:1.20.4-R0.1-SNAPSHOT:txt:maps-mojang</srgIn>
                <reverse>true</reverse>
                <remappedDependencies>org.spigotmc:spigot:1.20.4-R0.1-SNAPSHOT:jar:remapped-mojang</remappedDependencies>
                <remappedArtifactAttached>true</remappedArtifactAttached>
                <remappedClassifierName>remapped-obf</remappedClassifierName>
            </configuration>
        </execution>
        <execution>
            <phase>package</phase>
            <goals>
                <goal>remap</goal>
            </goals>
            <id>remap-spigot</id>
            <configuration>
                <inputFile>${project.build.directory}/${project.artifactId}-${project.version}-remapped-obf.jar</inputFile>
                <srgIn>org.spigotmc:minecraft-server:1.20.4-R0.1-SNAPSHOT:csrg:maps-spigot</srgIn>
                <remappedDependencies>org.spigotmc:spigot:1.20.4-R0.1-SNAPSHOT:jar:remapped-obf</remappedDependencies>
            </configuration>
        </execution>
    </executions>
</plugin>


Notes:

  1. Change the version string 4x to match your dependency.
  2. Check the latest special source version here. Please note that on some configurations, versions above 1.2.4 might not work. In this case, stay on 1.2.4.

By using the special source plugin, Maven will automatically reobfuscate your code to Spigot mappings to be compatible with your server.

Gradle/Groovy Installation Instructions

There is no special source plugin for Gradle, so we recommend using Spigot remapper by Patrick Choe.

Add mavenCentral() (for transitive dependencies) and mavenLocal() to your repository so that Gradle can find our Spigot dependency (use the artifact spigot with classifier “remapped-mojang” instead of the regular spigot-api). See above for examples.

Then, make the build task depend on the remap task so that you don’t have to run it manually every time you compile the plugin.

				
					// For Kotlin DSL:
plugins {
    java
    id("io.github.patrick.remapper") version "1.4.0"
}

repositories {
    mavenCentral()
    mavenLocal()
}
dependencies {
    compileOnly("org.spigotmc:spigot:1.20.4-R0.1-SNAPSHOT:remapped-mojang")
}
java {
    toolchain {
        languageVersion.set(JavaLanguageVersion.of(17)) // For Minecraft 1.18+
    }
}
tasks.remap {
    version.set("1.20.4")
}
tasks.build {
    dependsOn(tasks.remap)
}


That’s it! Just make sure to change the version numbers to match your remapped jar. 

Getting a Mojang Remapped Paper Server

If you’re using Ant to run your Minecraft server directly in IntelliJ to skip recompiling or reloading each time, using Mojang mappings won’t work.

Ant does not support reobfuscating your plugin before it launches, so it will complain about access issues since it’s still using Mojang mappings while the server uses Spigot’s instead.

However, Paper provides a Mojang remapped server for development purposes, which you can download using our endpoint here. Download the paper jar file, use it to start your server.

Please note that using a Mojang remapped server is unsupported by most plugins such as ProtocolLib and you might be limited to testing your plugin only.

Switching From Spigot To Mojang Mappings

Name of classes (i.e. EntityPlayer is now ServerPlayer) are different in Mojang mappings than on Spigot.

This is because Spigot developers did their best guessing at what the original names were before Mojang released their official mappings.

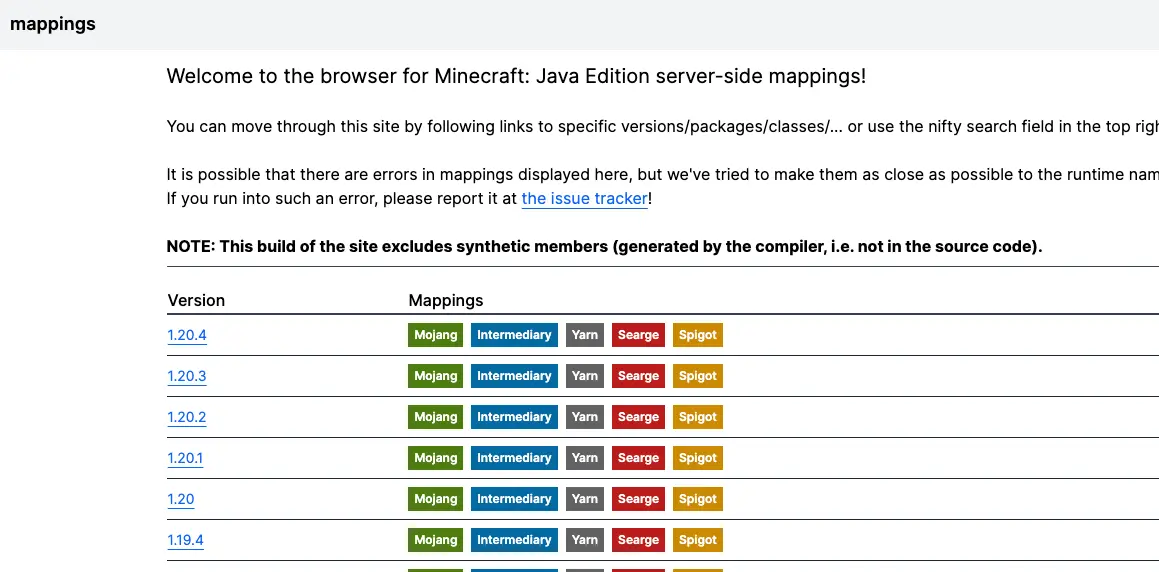
Use the NMS browser by screamingsandals to find name changes across mappings, and different Minecraft versions.

Open the link, click the desired version:

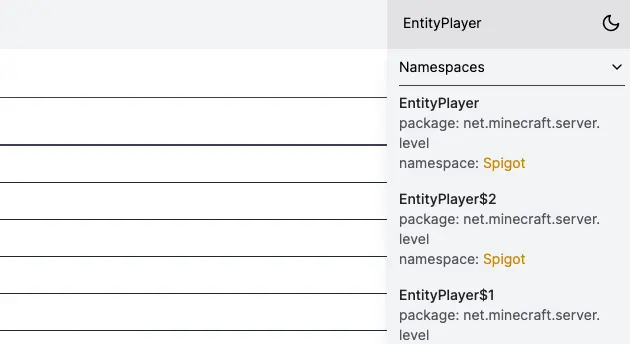
Then, type the class name from Spigot mappings into the search box, for example EntityPlayer:

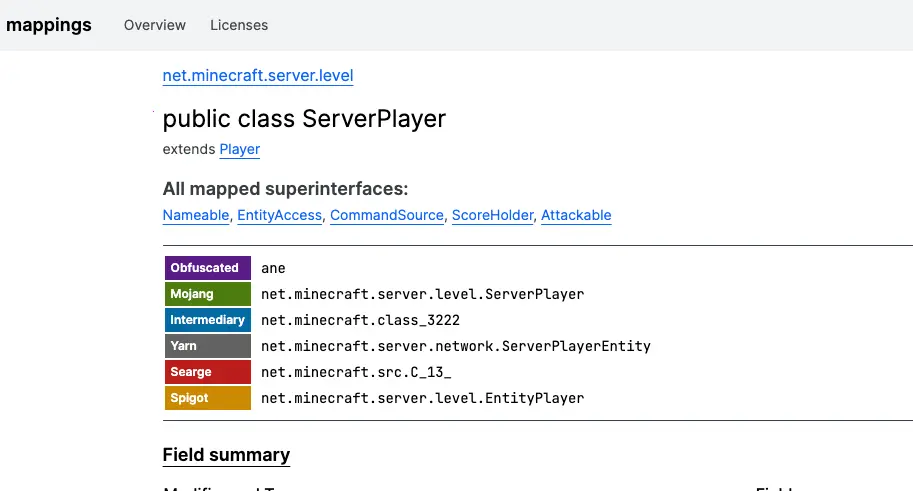
Finally, you’ll see that Mojang calls the class ServerPlayer (green “Mojang” tab) whereas it’s “EntityPlayer” on Spigot (orange “Spigot” tab):

You can view the differences in field and method names on the same page.

Supporting Different NMS Versions

Supporting multiple NMS versions is easy without Mojang mappings until Minecraft 1.17. On that version, Spigot has removed the package prefix in NMS so all future imported versions have the same package name and cause import issues.

Using Mojang mappings this problem becomes even more visible, so it’s recommended you use multiple projects/libraries each importing one NMS version at the time. You then shade your libraries within your main project and use interfaces for abstract to avoid direct NMS calls there.

Learn to use multiple NMS versions in our free tutorial here.

Learn To Use NMS In Minecraft Plugins (Spigot or Mojang Mappings)

NMS is one of the most confusing and complicated concepts in Minecraft.

There’s barely any resources for learning NMS, and the vast majority of those online are painfully outdated, disorganized or lacking.

We’ve created a complete class on learning NMS and OBC called NMS Advanced. It contains 7 weeks of lessons on custom pathfinders & AI, particles, animations, packets, NBT tags and so much more, including Spigot AND Mojang mappings tutorial for any Minecraft version.

You’ll get 2x/weekly 1:1 calls to review your code and get your questions answered, plus a 1,900+ community on Discord and our private portal, covered by 30-day guarantee. Click here to learn more!