The following is a complete guide for setting up a Minecraft Java Edition server running Spigot, Paper or Purpur on your computer.
This guide is complete, includes all the necessary files and is different from the other tutorials in that:
- It does not require changes to your network or opening a port.
- It’s meant for plugin developers, not for running a public server. You can open your server to the public using the standard network and port changes found in any other guide after you have a server using the instructions below.
- It works for any Minecraft version using Craftbukkit, Spigot, Paper, Purpur or any other fork.
- It includes performance optimizations to minimize resource usage when testing your Minecraft plugins.
Step 1: Installing Java
Step 2: Getting Spigot, Paper or Purpur
The official server from Mojang, creators of Minecraft, does not support plugins.
The most popular modded server software builds on top of Bukkit, which is no longer maintained and was replaced by Spigot, which extends it.
Today, most people prefer Paper, which builds on top of Spigot. Purpur is an alternative that builds on top of Paper and adds more customization features.
Getting Paper (Recommended)
We recommend using Paper for easy download, higher performance, more customization options and more API features (for plugin developers) over Spigot.
Get Paper here: https://papermc.io/downloads/paper
Getting Spigot
Spigot exited before Paper. It builds on top of Bukkit and adds more performance and optimization features. However, soon developers became dissatisfied with their policies and rigid pull request approval process, and extended Spigot to form Paper.
If you still require Spigot, please note that getting the server software requires compiling 20,000+ files on your computer and 800mb+ downloaded software.
For instructions on how to compile Spigot this, see this article: https://www.spigotmc.org/wiki/buildtools/
Getting Purpur
Purpur builds on top of Paper which builds on top of Spigot which builds on top of Bukkit. Purpur adds even more customization options than Paper but its developers have to wait for Spigot and Paper to update and merge changes manually.
We recommend avoiding “forks of forks” due to limited community overwatch for bugs and instabilities. Some plugins tend to break due to a fork’s optimization features.
Get Purpur here: https://purpurmc.org/downloads
Step 3: Starting The Server
Once you have downloaded a jar file, rename it to “server.jar” and put it into a new folder, such as “1.21”.
Check that your OS shows all file extensions, otherwise you might accidentally make a file called “server.jar.jar” which won’t be found by your launching script. Here are tutorials on how to show file extensions on Windows 11, Windows 7-10 and macOS.
Using The Launching Script
Do not double-click the jar file because it needs an additional file with parameters to run. We’ve put these in the “launch-scripts.zip” file you can download here:
Step 1: Open the zip and put the appropriate file for your operating system next to your server jar.
Step 2: Open the file with a text editor such as Notepad++ or Sublime Text, and rename paperclip.jar to your server file name, such as server.jar.
(Optional) Step 3: If you run a Minecraft version older than 1.15, remove the “–nogui” parameter on the end of the long line since it’s unsupported on old versions.
(macOS/Linux) Step 4: Open Terminal and allow your launch file to run. Change into your server folder and run “chmod u+x launch-mac.command”, or pass the full path in quotes: “chmod u+x ‘/Users/you/Test Servers/1.21/launch-mac.command'”. You do not need sudo for a file you own, and you do not need chmod 777, which would let every account on the computer edit the script that starts your server.
Once you’re done, double-click the launch file.
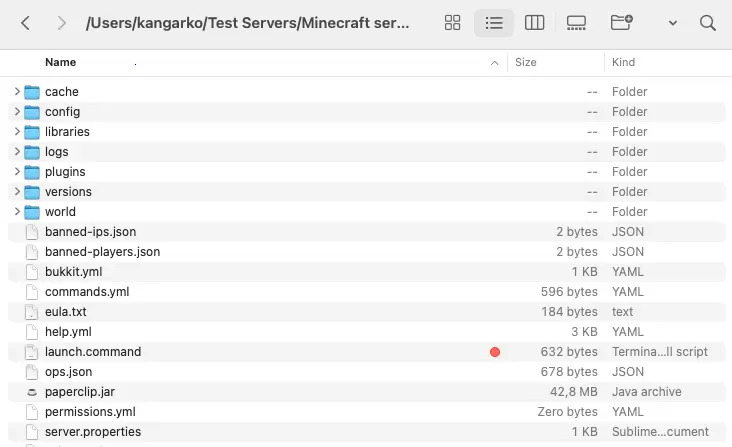
Initial Launch
The server should start loading until it complains about the eula file. Close the console window, open eula.txt in your server folder and set the value of”eula” key to “true”.
Start the server again using the launching script and voila, it should now finally finish loading with a message saying “Done” once it is finished.
(Optional) Step 4: Tweaking Performance
Here are our tweaks to make your server load faster and use less computer resources.
These tweaks strip the server down to what we need when developing and testing our Minecraft plugins. They are not general optimizations, so on a server you actually play on, read each one before copying it:
- bukkit.yml — Set settings.allow-end and settings.query-plugins to false. This will disable the end dimension for faster server startup and querying plugins in rcon (unless you specifically know you need this feature.
- config/paper-global.yml (or paper.yml for older Minecraft versions)
- and spigot.yml — Find any verbose key and set it to false. This will remove console spam.
- server.properties —
- network-compression-threshold to -1 (disable compression on localhost)
- online-mode to false lets you connect under any name, which is handy for testing several accounts at once. It also drops the check against Mojang’s account database, so anybody who can reach the server can log in as anybody. Pair it with server-ip set to 127.0.0.1 so only your own computer can connect. A blank server-ip binds the server to every network interface, and skipping the router port forward does not change that. On a server you play on with other people, leave online-mode at true.
- allow-flight to true
- view-distance to 4 (the less the less drain for your computer resources)
- allow-nether to false (disables the nether, faster server start)
- gamemode to creative
- motd to whatever you wish to be shown in the Minecraft Multiplayer list screen (spaces are supported), use § for color codes
- (if available) snooper-enabled to false
- (if available) server-name to whatever you want your server to be called (without spaces), examples: test,myfirstserver
(Optional) Step 5: Installing Plugins
If you are a Minecraft plugin developer, we highly recommend installing the following plugins. Check if each plugin is compatible with your Minecraft server version.
- Tester: mineacademy.org/tester (compatible with all Minecraft versions) – Useful for developer and debugging shortcuts, also cleans your plugins/ folder.
- EssentialsX: spigotmc.org/resources/9089 – Useful for command shortcuts.
- LuckPerms spigotmc.org/resources/28140 – Permission management.
- ProtocolLib: spigotmc.org/resources/1997 – Packet manipulation.
- Vault: spigotmc.org/resources/34315 – Connects plugins together.
- WorldEdit: dev.bukkit.org/projects/worldedit – Mass-block manipulation.
(Advanced) About Startup Scripts
Explanation for some flags in the scripts:
“-Xmx2G” is the maximum heap memory your computer reserves for the Minecraft server. Java needs more on top of that number for itself, so Paper recommends leaving 1000 to 1500 MB free beyond it, plus whatever your operating system and your IDE need. 2G suits a test server on a laptop that also runs IntelliJ and the game. Raise it when you load large worlds or many plugins.
“-Xms2G” is the starting memory (RAM) your computer uses for the Minecraft server. Same rules apply as for the Xmx flag above.
To learn more about other startup parameters in the launching scripts, see: https://docs.papermc.io/paper/aikars-flags
Developing Minecraft plugins
If you’re interested in developing your own Minecraft plugins, check out this Minecraft plugin development guide. It works for Bukkit, Spigot, Paper, Purpur and any other fork.
Once your first plugin runs on this server, the next problems show up fast: storing player data, building a menu, moving work off the main thread, keeping somebody from reposting your jar.
You can guess your way through them, and most people do. With nobody actually looking at your code, the guesses turn into habits, and the habits are what you rewrite a year later.
That is what I built Project Orion around. Every week I run a Zoom call where you share your screen and I review your code with you, and over 4,000 students have come through it.
The training contains a full Java course, 177 plugin development lessons, from game events and commands through menus, SQL databases, BungeeCord/Velocity, custom mobs, claims and regions and minigames.