
Welcome to Episode Five of our Minecraft plugin development series.
Click here to see the forth episode where I show you how to create custom commands and tab complete them when making Minecraft plugins.
In this episode, we’re going to cover:
- Using LuckPerms — A crash-course for using a permissions’ plugin.
- Permissions in plugin.yml — Using plugin.yml to register permissions in 3 modes.
- Permissions in your code — Using Player#hasPermission().
- Adding and removing permissions using Player#addAttachment().
Source Codes:
Links:
- LuckPerms — You can visit the official LuckPerms website at luckperms.net and see their tutorial for beginners at https://luckperms.net/wiki/Usage
- Essentials — Here is an example of how permissions look like in Essentialsx: https://essinfo.xeya.me/permissions.html
- Plugin.yml tutorial — Everything you can put inside plugin.yml including how to register commands there you can find at: https://docs.papermc.io/paper/dev/plugin-yml
What Are Permissions In Bukkit?
Permissions are simple strings such as “chatcontrol.command.mute” that will allow players to perform certain commands or actions on your server.
Bukkit by default does not have a permission management system, so I recommend using a plugin for this such as LuckPerms.
You can give players permissions with a true or a false value, false meaning you practically take away a permission that they might have been given or inherited, see the plugin.yml example below.
Please see the Getting Started guide on LuckPerms website to learn more about permissions groups.
I will walk you through this in the above video and I will also show you the easiest way to configure LuckPerms for beginners.
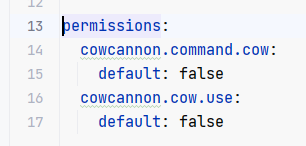
Defining Your Permissions In Plugin.yml
You can register your custom plugin permissions inside your plugin.yml file.
The “default” value can be three types:
- “op” to automatically give the permission to operators,
- “false” to never give to anyone not even operators UNLESS you use your permissions plugin to give it, and
- “true” to always give to anyone unless you use your permissions plugin to give a “false” permission (see the video above).
Checking For Permissions
You can simply call player.hasPermission(name) in your code where the name is the permission name (i.e. “cowcannon.command.cow”) to see if the player has the given permission.
Using Permission Attachments
You can use plugin.yml, LuckPerms or Bukkit to give or take permissions. We covered plugin.yml above, for LuckPerms, see the /lp command in the game or above link, and here is how to add/remove permissions using Bukkit.
Adding permissions:
To add a new permission, call player.addAttachment(plugin, name, value) where the plugin is your plugin’s instance, the name is the name of the permission (i.e. “boss.command.spawn”) and the value is either true or false.
Adding a permission (called attachment) will return the permission attachment object, which is handy because you can store it to remove it later.
Please note that the player will lose his permission upon exiting and rejoining the game. You need to therefore re-add all of his permissions in the PlayerJoinEvent.
Removing permissions:
Simply call player.removeAttachment(attachment) where the attachment is the object returned when adding a permission.
Listing all custom permissions:
Final Words
Creating Minecraft plugins can be confusing, with most YouTube tutorials being painfully outdated, disorganized and offering no live support.
If you want to learn from the best of the pack and create truly customized plugins, check out Project Orion.
It’s a full fledged training tried and tested by 2,000+ people showing step-by-step on how to make plugins, advanced systems (minigames, custom mobs, antipiracy, dungeons, claims etc.) and best yet, I am doing live calls multiple times each week and connect with you in our community to answer any and all questions you have.
It’s just so much better experience than any blog post or video since I can pour my time and heart into it with greater depth and our platform is custom coded with features we need for it specifically. Click here to learn more!