
In this tutorial, we will show you how to create a Discord bot using JDA (Java Discord API). With its own slash commands and running as its own CLI program through your Terminal.
Discord is one of the most popular communication platforms for gamers, developers and regular people alike.
One of the best things about Discord is its open API, which allows developers to build their own bots that can perform various tasks such as moderation, automation, and integration with other services.
Prerequisites
Before we start, you need to have the following:
- A Discord account
- Java 17 (LTS) or later
- An IDE such as Eclipse or IntelliJ IDEA (Project Orion includes 4 months of IntelliJ Ultimate)
Terminology
- Application:
An application is a representation of a single “project” or “product” within the Discord ecosystem. This can refer to a game, bot, integration, or any other type of project that interacts with their API. An application in Discord is typically associated with a unique client ID, which is used to identify the application and authenticate it with the Discord API. - Client ID:
A unique identifier assigned to an application or bot when it is registered with the Discord API. The client ID is used by Discord to identify the application internally or bot when it interacts with the API or users on the platform. - Bot Token:
The password for JDA to connect with the Discord API. Without this token, you are unable to login to your bot and perform actions. - Gateway Intent:
A gateway intent is used by discord to decide what bot is able to access what data exactly. For verified bots (75+ servers and still growing), you have to provide a valid use case for it to gain access to all messages that the bot can recieve.
Step 0: Create a application and make a project
Creating the Discord Application
The first step is to create a new Discord bot application. To do this, follow these steps:
Head on over to the Discord Developer Portal, this is the place where you manage all applications for a bot account. You will need this so Discord knows who owns a bot, a possible privacy policy (if they get verified) and most importantly, so you can get a token to interact with Discord’s API. Once you are in the portal, it should look something like this (If you have not done this before):
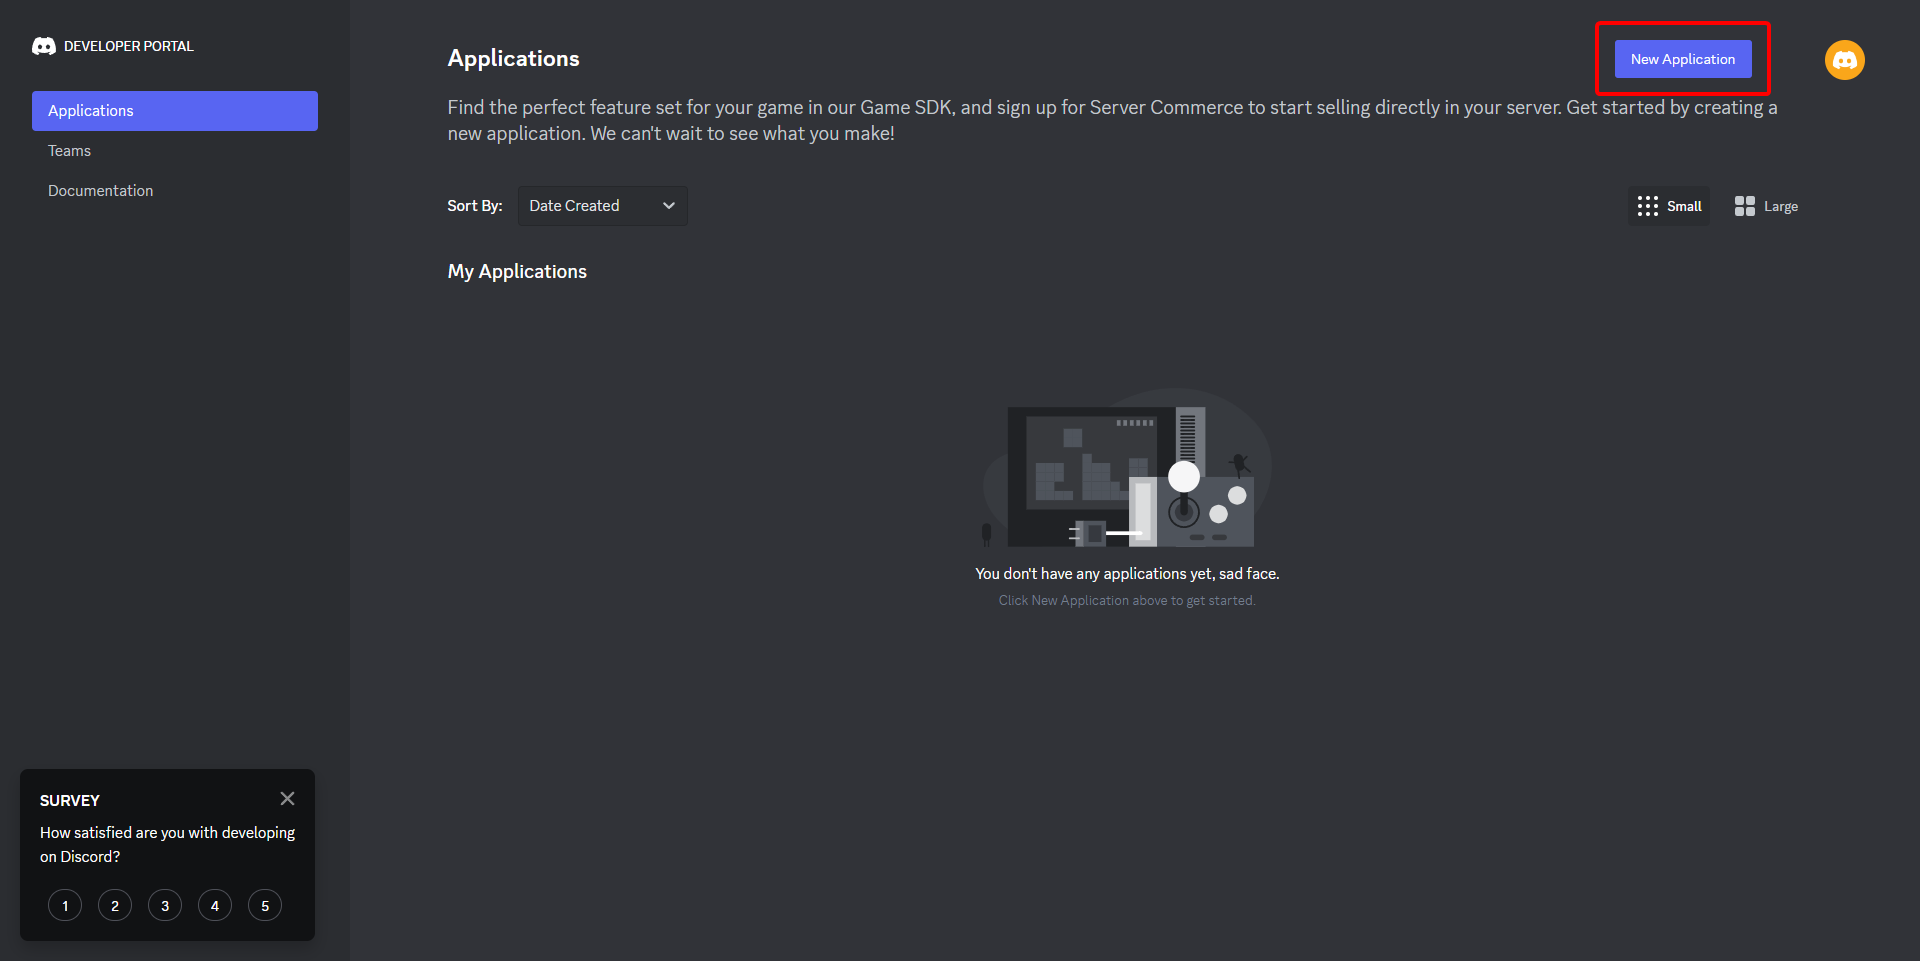
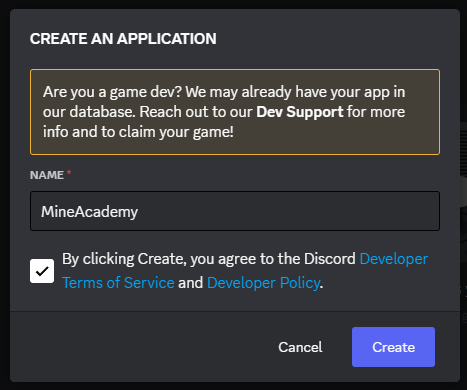
Click on “New Application” and give your application a name, agree with the Developer Terms of Service and Developer Policy:
Once approved, you continue to the dashboard:
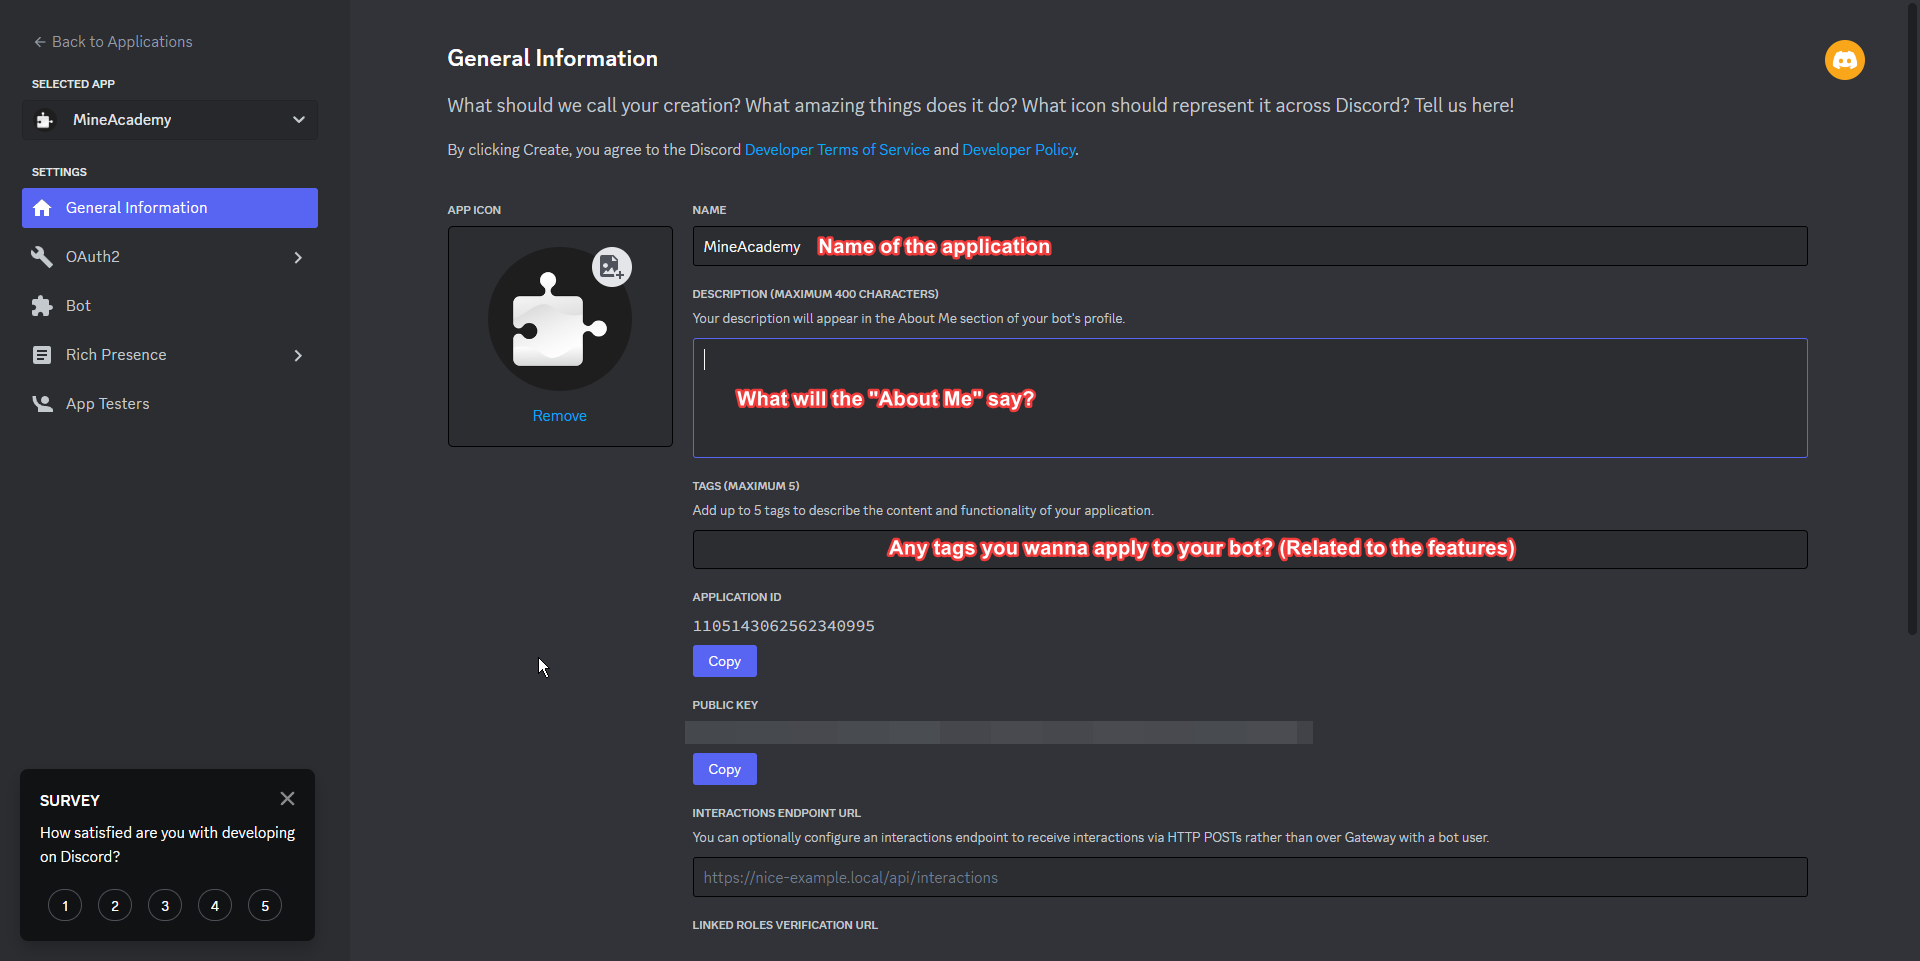
In the dashboard, you have control over multiple things, like the “About Me” section of the bot. (All bot become a “user” account. Bots just get some extra endpoints to use, things that user accounts are unable to do). You’ll go to “Bot” on the left.
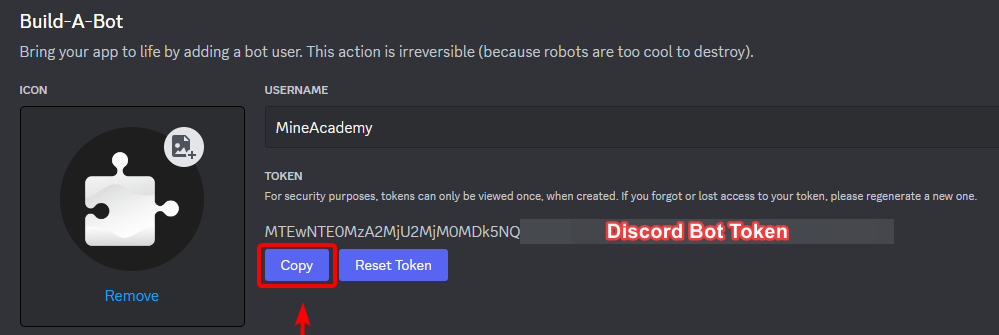
Once you click copy, you get your entire bot token in your clipboard DO NOT SHARE THIS TOKEN WITH ANYONE. It’s the equivilent of your email AND password on discord. Store this somewhere secure.
Scroll down a bit on the page and go down to the “Privileged Gateway Intents”. Then enable “Server Members Intent”. We’ll need this along the way.

Creating your IntelliJ workspace
After you’ve installed IntelliJ, you’ll get this interface on boot. Click on “New Project” to create a new workspace for your own JDA bot:
This will be your own preferences mostly, for the new project. You will want to name it whatever you want, we’re adding a git repository so the IDE keeps track of all the changes made to the project.
For the JDK, we use Adoptium 17 (LTS). You can either download it in the JDK selection menu, or on the site linked above.
For the build system, we’ll select Gradle, with the DSL being set to Kotlin.
Now, you can decide the GroupID and ArtifactID for yourself. But, imagine you own the domain “developer.com” and you make a bot called “David“. You’d set your GroupID to com.developer, and your ArtifactID to “David“. You’ll see why this matters in a second.
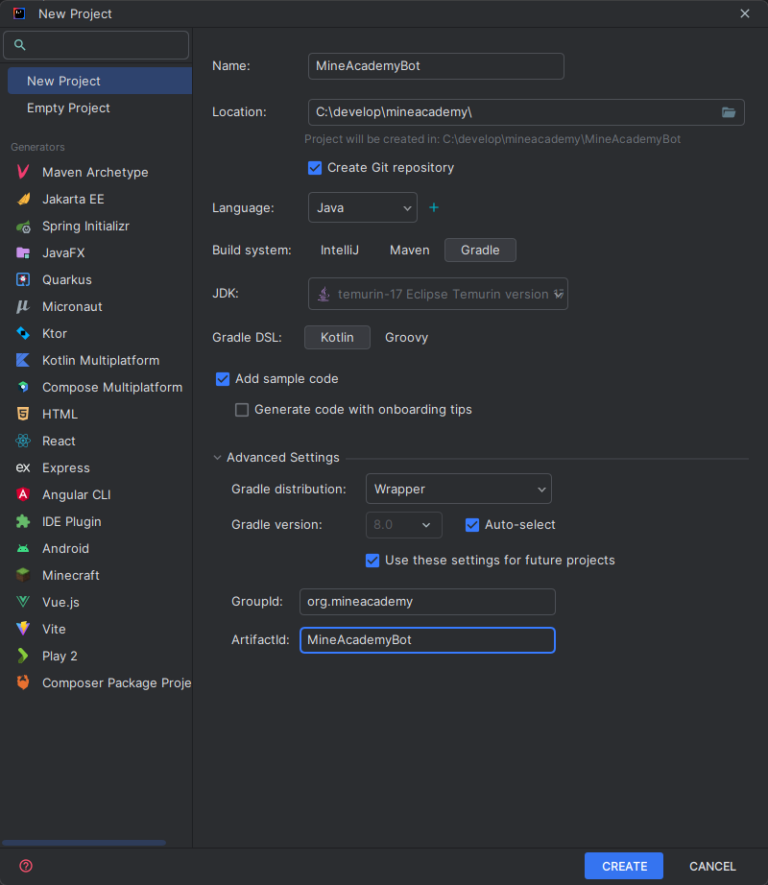
After clicking “Create”, IntelliJ will start to download all the dependencies it needs to run and build your code, let it run until the window expires:
Once completed, you should have a fully up and running workspace with Gradle and the JDK installed. We’ll now begin with seting up our dependencies.
Step 1: Installing dependencies
Once IntelliJ has setup your project, it will start to download and build your dependencies. It’s the same as Maven in that regard, and is able to use maven repositories as well.
Maven has a file called pom.xml, the gradle equivalent of this is build.gradle.kt, open this file from your explorer. You’ll see the following text:
					plugins {
    id("java")
}

group = "org.mineacademy"
version = "1.0-SNAPSHOT"

repositories {
    mavenCentral()
}

dependencies {
    testImplementation(platform("org.junit:junit-bom:5.9.1"))
    testImplementation("org.junit.jupiter:junit-jupiter")
}

tasks.test {
    useJUnitPlatform()
}
This is the code for your repositories and dependencies. Gradle uses this file to know “Hey! I need to download these files from this location”. Just like gradle. We’re gonna modify this file a bit so we can run a so called “executable fat jar”. This is a file with all your dependencies and the code of the bot itself in it. Your file should look something like this once we’re ready:
					import org.gradle.jvm.tasks.Jar

plugins {
    idea // Plugin to add support for the IntelliJ IDE
    application // Plugin to tell Gradle "Hey, this is a runnable application! Package it like one"
    id("java") // Tell Gradle this is a java project
}

group = "org.mineacademy"
version = "1.0"

repositories {
    mavenCentral()
}

dependencies {
    testImplementation(platform("org.junit:junit-bom:5.9.1"))
    testImplementation("org.junit.jupiter:junit-jupiter")

    // We add the JDA dependency here, allowing gradle to download it from maven central. Make sure to use the latest version if you can!
    implementation("net.dv8tion:JDA:5.0.0-beta.20")

    // https://mvnrepository.com/artifact/commons-cli/commons-cli - Additional CLI library for argument parsing
    implementation("commons-cli:commons-cli:1.5.0")

}

tasks.test {
    useJUnitPlatform()
}

application {
    // Tell Gradle what the main class is that it should run, this differs per project based on your packages and classes.
    mainClass.set("org.mineacademy.Main")
}

// We make a task "farJar", this is a task that will create a jar file that contains all the dependencies.
val fatJar = task("fatJar", type = Jar::class) {
    duplicatesStrategy = DuplicatesStrategy.EXCLUDE
    manifest {
        attributes["Implementation-Title"] = "MineAcademyBot"
        attributes["Implementation-Version"] = version
        attributes["Main-Class"] = "org.mineacademy.Main" // Same mainclass as the application plugin setting
    }
    from(configurations.runtimeClasspath.get().map{ if (it.isDirectory) it else zipTree(it) })
    with(tasks.jar.get() as CopySpec)
    destinationDirectory.set(layout.buildDirectory.dir("dist"))
}

tasks {
    "build" {
        // And we tell during the build task, that it DEPENDS on the fatJar task, so it will always run the fatJar task before the build task.
        dependsOn(fatJar)
    }
}
If any change are made to the build file, IntelliJ will show this as a popup. Click on it so it reloads the Gradle file, and downloads all new files that you just added to your project.
If your build file has correctly loaded. You should see that the file now has colored formatting. We’ll go to the main class to work on the bot!
Step 2: Code the inner workings of the bot
Code on the main class
You have now installed the required dependencies to create your own discord bot. Amazing!😯
To continue, you’ll have to start coding on the main class. This is very easy, as it requires only a few things to start listening to your code. You have the option to do 2 things, run a discord bot with / commands, and with text commands.
There is a difference between the 2, and the primary one is that all discord bots are required to use slash commands, unless they provide such unique features that they should have access to the gateway intent of “Messages” (See Terminology). Comparing this to a Minecraft plugin, it is roughly the same. With a few modifications to allow some customisation during bootup. Like providing the token during runtime, instead of hardcoding it into the bot itself.
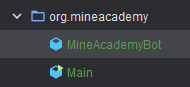
For now, we will ignore the main class. We have to do some preperation in an extra class. We’ll come back to the main class later. Remember your ArtifactID? Yeah, we’re gonna need it now! Create a new Java class in the folder of your GroupID. Create a new class in the same folder/package as your main class.
Once you open the new class, it should look something like below:
					package org.mineacademy;

public class MineAcademyBot {

}
We’re making some changes to the traditional way classes are used, making the bootup of the bot an entire class. Create a protected static instance of the bot itself, this will be the point reference for any outside calls from the bot. Let’s start by creating this, and an additional call for the class itself.
					package org.mineacademy;

public class MineAcademyBot {
    // We reference the class here, also known as the instance.
    protected static MineAcademyBot selfBot;

    // We will parse the token through an cli argument, this is a protection against leaking the token by accident. (By uploading it to git for example)
    public MineAcademyBot(String token) {}
}
When these are set, we go back to our Main class file. We’ve installed org.apache.commons.cli.* in addition to the JDA, if you’ve followed the gradle install correctly, you should have this loaded as a dependency.
In the main class, we’ll have to add a bit of code to support in-line arguments. Start by providing the options people can choose from:
					package org.mineacademy;

import org.apache.commons.cli.*;

public class Main {
    public static void main(String[] args) {
        Options options = new Options();

        options.addOption(new Option("h", "help", false, "Displays this help menu."));
        options.addOption(new Option("t", "token", true, "Provide the token during startup."));

        CommandLineParser parser = new DefaultParser();
        HelpFormatter formatter = new HelpFormatter();

    }
}
Additionally, we need an parser and formatter to (properly) display the options and parse them during the startup of the bot. Thats what the CommandLineParser and HelpFormatter are for. Now, lets program what all options do. And additionally starting the bot with the token!
We’ll stop the bot if the help command is requested, or if token does not have a value. We can do that by requesting the value’s from a CommandLine parser.
					package org.mineacademy;

import org.apache.commons.cli.*;

public class Main {
    public static void main(String[] args) {
        Options options = new Options();

        options.addOption(new Option("h", "help", false, "Displays this help menu."));
        options.addOption(new Option("t", "token", true, "Provide the token during startup."));

        CommandLineParser parser = new DefaultParser();
        HelpFormatter formatter = new HelpFormatter();

        try {
            CommandLine cmd = parser.parse(options, args);

            // Check if the help argument was provided.
            if (cmd.hasOption("help")) {
                formatter.printHelp("Help Menu", options);
                System.exit(0);
            }

            // Check if the token argument was provided and has a value. If it doesn't, return null.
            String token = cmd.hasOption("token") ? cmd.getOptionValue("token") : null;
            if (token == null) {
                System.out.println("ERROR: No token provided, please provide a token using the -t or --token flag.");
                formatter.printHelp("", options);
                System.exit(0);
            }

            // If it passes through everything, it starts the bot and sends the token to our second class.
            MineAcademyBot.selfBot = new MineAcademyBot(token);
        } catch (ParseException e) {
            System.out.println(e.getMessage());
            formatter.printHelp("", options);
            System.exit(0);
        }
    }
}
Now, on line 33. You are able to see we are setting the instance class of the bot. This gives us a way to mitigate a specific bad practice, “Static Abuse”. We’re providing the required values for the bot to start without needing the static instance of the bot. And we don’t have to look back at the settings ever again.
We’re gonna add our ShardManager now, this is something you should build in as soon as possible, as migrating this when your bot get’s more famous makes it more complicated to migrate in the future.
Our instanced bot class
					    private ShardManager buildShardManager(String token) throws LoginException {
        // It is often better to load your token in from an external file or environment variable, especially if you plan on publishing the source code.
        DefaultShardManagerBuilder builder =
                DefaultShardManagerBuilder.createDefault(token);

        return builder.build();
    }
Now, the above code can be added below the
public MineAcademyBot(String token) {}
Once added here, create an private variable for the ShardManager class. Place it below the selfBot variable:
private ShardManager shardManager = null;
					package org.mineacademy;

import net.dv8tion.jda.api.sharding.DefaultShardManagerBuilder;
import net.dv8tion.jda.api.sharding.ShardManager;

import javax.security.auth.login.LoginException;

public class MineAcademyBot {
    protected static MineAcademyBot selfBot;
    private ShardManager shardManager = null;
    public MineAcademyBot(String token) {
        try {
            shardManager = buildShardManager(token);
        } catch (LoginException e) {
            System.out.println("Failed to start bot! Please check the console for any errors.");
            System.exit(0);
        }
    }

    // The JDA Shardmanager instance, this is the brains of the entire bot. Without this, the bot doesn't boot.
    private ShardManager buildShardManager(String token) throws LoginException {
        // It is often better to load your token in from an external file or environment variable, especially if you plan on publishing the source code.
        DefaultShardManagerBuilder builder =
                DefaultShardManagerBuilder.createDefault(token);

        return builder.build();
    }

    public ShardManager getShardManager() {
        return shardManager;
    }
}
Congratulations! You have now made your own bot and coded the startup of said bot, now it’s time to test it out. Go back to your main class, and click on the “Run” button on the left of your sidebar. Once you do that, the code should give you the error “No token provided, please provide a token using the -t or –token flags“. We can do this very easily in IntelliJ.
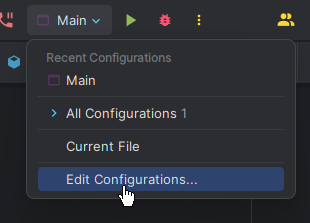
Head on over to the top of the application and click on “Main”, this will give you a menu to select what to do. Click on “Edit Configurations”
On this menu, click on “Program arguments” inside of “Build and run”:
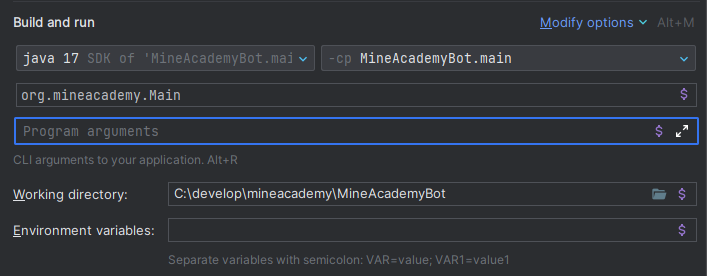
Remember your token? Yeah? Didn’t share it with anyone? Good. Add:
-t <your token without the brackets>
To the program arguments, this will set the token and allow the bot to startup! Click save, and try starting the bot again. If this has been done correctly, you should see a console appearing. And the program running without stopping.
Step 3: Code a listener and register slash command.
Create the a listener class
You’ve sucessfully coded a default Discord bot that launches based on the token provided in the arguments! Now we’re going to add a listener to your code, this way we’re able to listen for any/all events that are sent to the bot. We’re going to follow the same step to create a new class and name it “listener.DiscordEventListener“, we’re adding a dot so IntelliJ makes “listener” a package. This helps us keep our code clean.
Now, your class will look like this once created:
					package org.mineacademy.listener;

public class DiscordEventListener {

}
To make clear to our IDE, JDA and the bot that this is a class for all Discord listeners. We extend it by ListenerAdapter, this is the class that contains all methods for events. What we’ll do is override these.
Start by making a variable that references back to the listener class. We’ll add an argument to the code so it get’s the main class internally. This helps so we don’t have to statically call the method everytime.
					package org.mineacademy.listener;

import net.dv8tion.jda.api.hooks.ListenerAdapter;
import org.mineacademy.MineAcademyBot;

public class DiscordEventListener extends ListenerAdapter {
    public MineAcademyBot bot;
    public DiscordEventListener(MineAcademyBot bot) {
        this.bot = bot;
    }
}
We have now created a class that can be called by methods in the main class, however. JDA still ignores this class as we have not setup the code for it to pass events through to the class. Let’s do that by going back to our class!
On our DefaultShardManager, we’ll add a method to add our new class as an event listener, this will make it so all events (Slash Commands, Messages, and so on) are passed through to the listener. Make sure you also move the “;” otherwise the code will start erroring.
					    private ShardManager buildShardManager(String token) throws LoginException {
        DefaultShardManagerBuilder builder =
                DefaultShardManagerBuilder.createDefault(token)
                        .addEventListeners(new DiscordEventListener(this));

        return builder.build();
    }
Add the bot and register a slash command
When that’s added, we go back to the code of our DiscordEventListener class and add our events to the mix. We’ll start by registering our slash commands. For now, we’ll add the command to a single server. Slash commands do not depend on a bot user in the guild; they use the interactions model. To create commands in a guild, your app must be authorized with the applications.commands scope which can be used independently, but is also automatically included with the bot scope.
We’ll need a guild to work with this, so let’s invite the bot to a guild of your choosing.
The above is a link to (supposedly) give your application permisions to add slash commands to your server, and add the bot user. What you will have to do is replace the client id in the url. (Replace 1105143062562340995) with the Client ID of your application.
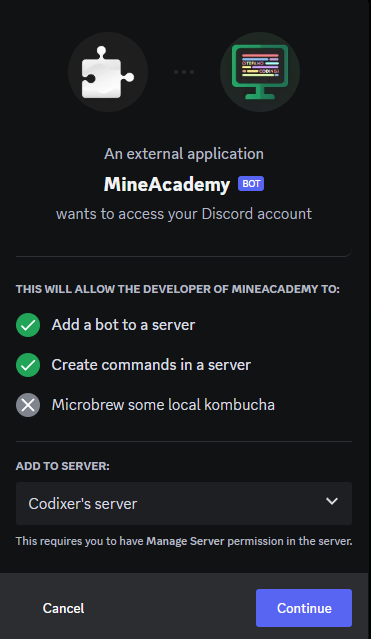
You select the server you want to allow commands to be added to, together with the bot we’ve just made a user for. Once added, we can move on to create our commands that will be used by the application.
WARNING: We’ve ALSO given the bot admin permission in this example, do NOT give this out to any bot that asks for it. Make sure you fact check what permissions a bot ACTUALLY needs before adding them.
Let’s go back to our listener class, we’ll register our commands with a seperate event called the “ReadyEvent“, this is used to tell our code “Hey, the bot has launched. Do whatever”. We’ll add a slash command “hello” to our code. Forcefully adding it to the guild.
We’ll have to call the guild object before we are able to send our command to it. We do that by calling the shard manager from the bot variable we created in that same class. Commands that are added for a guild get added instantly, however global commands take about 1 hour to get synced to Discord. Keep that in mind while creating your bot.
					package org.mineacademy.listener;

import net.dv8tion.jda.api.entities.Guild;
import net.dv8tion.jda.api.events.session.ReadyEvent;
import net.dv8tion.jda.api.hooks.ListenerAdapter;
import net.dv8tion.jda.api.interactions.commands.build.Commands;
import net.dv8tion.jda.api.requests.restaction.CommandListUpdateAction;
import net.dv8tion.jda.api.sharding.ShardManager;
import org.jetbrains.annotations.NotNull;
import org.mineacademy.MineAcademyBot;

public class DiscordEventListener extends ListenerAdapter {
    public MineAcademyBot bot;
    public DiscordEventListener(MineAcademyBot bot) {
        this.bot = bot;
    }

    // There is a reason why we don't add the commands IMMEDIENTLY after the bot starts up. The bot has to load in all the guilds it is in before it can add commands.
    @Override
    public void onReady(@NotNull ReadyEvent event) {
        registerCommands(bot.getShardManager());
    }

    // This method is called when the bot is ready to add commands. This is where we add the commands to the server.
    private void registerCommands(ShardManager jda) {
        Guild g = jda.getGuildById("1087158859870773371"); // Replace this with the ID of your own server.
        if (g != null) {
            CommandListUpdateAction commands = g.updateCommands();
            commands.addCommands(Commands.slash("hello", "Have the bot say hello to you in an ephemeral message!")).queue();
            // All slash commands must be added here. They follow a strict set of rules and are not as flexible as text commands.
            // Since we only need a simple command, we will only use a slash command without any arguments.
        }
    }
}
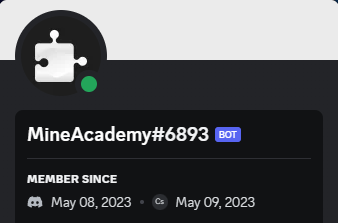
If done correctly, your bot should now show up as online in the discord, and at the same time. Your command should be added to the guild. Press / in the chatbar, and see if your application has created a slash command.
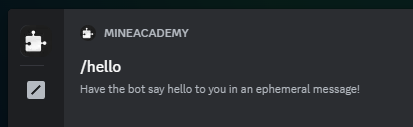
Great! The command has been added to the guild! However, when you try to run it. It doesn’t do anything, maybe we’re forgetting something?
Step 4: Coding your command!
Listening for the slash command events, and responding to them
To respond to a slash command being ran, we’ll have to listen to all commands being ran for our bot. We do this by adding an additional method that we’re going to override. Just like the ReadyEvent, we’ll listen for the “SlashCommandInteractionEvent” and respond with a quick reply. We request the name of the command being asked for, and immediently reply with the response “Hello <@userid>“. This is done by asking for the member through the interaction event. The bot should return the response almost immediently according to the code.
					    @Override
    public void onSlashCommandInteraction(SlashCommandInteractionEvent event) {
        if (event.getName().equals("hello")) { // Is the command name "hello"?
            event.reply("Hello " + event.getUser().getAsMention() + "!") // What will we reply with?
                    .setEphemeral(true) // Do we want the message hidden so only the user who ran the command can see it?
                    .queue(); // Queue the reply.
        }
    }
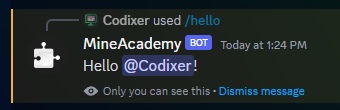
The bot now has a command where we mention the user in a message only they can see. There are some limitation to hidden messages, however. We don’t have to deal with those today. If done correctly, you can (re)start your bot and try to run the command again! If done correctly, the command show show something similair to the below result.
Step 5: Packaging your bot and execute it
Tell gradle to build your discord bot as a cli application
This is the step where we made a FatJar for the bot! Go ahead and open the menu for gradle on the sidebar of IntelliJ, open your project. Open the tasks folder, then double click on “build”.
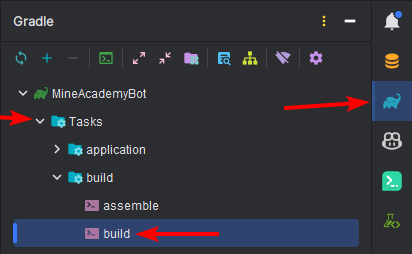
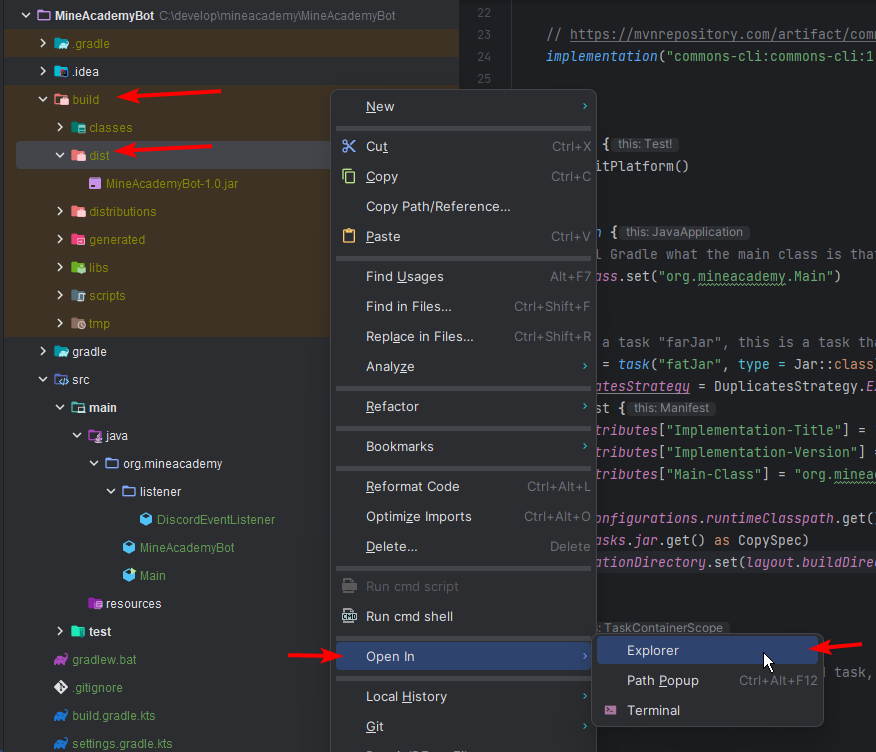
Gradle will start building your bot, this will go very quickly as our bot is very small and only has a few tiny commands. If there are no errors in the build process, move on over to the “build” folder, and open “dist”. This contains your jar file. Right-click it, move to “Open in >”, and click “Explorer”.
Execute/run your bot by launching it through your terminal
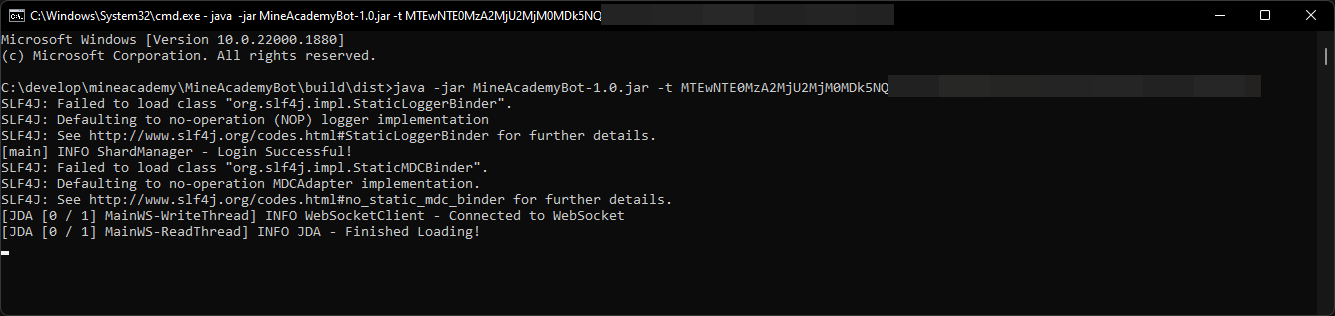
To finish off, go to the top of your explorer window. Click on the adress bar, and type “cmd”, this will open a command window. Within that new window, type:
java -jar <name of your file.jar> -t <token of the bot>
If done correctly, your bot should come online once again!
Congratulations!
You have successfully created your own discord bot, with it’s own slash commands using JDA (Java Discord API)! As long as the terminal above is still running, it should respond to the commands that where created. You can expand upon these through trail and error. From bots that play music, to advanced bots with their own managed command system.
This is just a simple example of what you are able to do with discord bots, who knows. Maybe you will create the next Dyno?